This guide to building a clay oven was written back in 2013 when we built the clay oven at Thistledown (and before we built the café around it!). I had planned to update the guide as there are a few things I’d do differently now, but for now it’s published as is. This oven really has been a joy to cook on and we’ve cooked over 100,000 pizzas and flatbreads in it! Cooking with a wood-fired oven is so much fun and very versatile – I’d highly recommend investing in the raw materials for a build rather than buying a fancy barbecue! We are hoping to build at least one more clay oven this year so we’ll post updated info after that. Please do get in touch if you have any questions.
Original post:
We’ve wanted to build a clay oven for a number of years, and finally got around to it in October. We enlisted the services of Sam Makumba, a local potter who has built dozens of clay ovens over the years, and press-ganged 20 friends into a weekend’s service! Despite choosing the weekend when the St Jude storm hit, the build went very well. Read on for a fairly thorough description of our method, which I hope will help others construct clay ovens. If you have any questions or would like to suggest improvements then please don’t hesitate to get in touch.

Before we started work I drew up the planned oven (very roughly) on Sketchup (a free 3D drawing program that is very easy to use), to get an idea of the space. The oversized surround of the oven is for food prep and placing hot roasting trays. The oven itself has a 4ft interior, which is quite large for a clay oven but we wanted to be able to cook a number of pizzas at once, or roast a whole lamb / half pig if required! The base is approximately 8ft square. This style of clay oven is relatively easy and fast to construct, as long as you have enough hands. That said, there are numerous beneficial construction tips and techniques that an expert such as Sam has gained through years of experience. This style of clay oven can be built in a weekend, without waiting for layers of clay to partially dry.
Satisfied that the oven would work well in the area, Steve (from Stroud Lime) and I set about constructing the base. We built this from concrete blocks that we’ve had lying around for years, and infilled with several tonnes of subsoil and some rock (one of the bonuses of having 70 acres to store and source materials!). We used subsoil as it is more stable than topsoil, and will hopefully not settle too much. We compacted each layer as well as we could.

The compacted material came up to approximately half a metre below the top (which was about 90cm high in total). Above the subsoil we only wanted to use materials which would be stable when heated, as the floor of the oven will conduct a lot of heat into the base. Once the subsoil layer was completed, and we had all of our materials to hand, we were ready for the next stage – the building of the floor and dome! This is very labour intensive and could only begin once we had more people onsite that weekend.
Our clay oven materials list:
- 1000kg of terracotta – this is one of the cheapest clays, but will withstand the temperatures that the oven will reach
- 500kg of building sand – this is more stable when heated than sharp sand, and easier to mix smoothly
- Two straw bales – to chop and mix with the terracotta to provide strength and insulation
- 50kg grog – to mix in with the terracotta
- Sharp sand for creating the dome – the larger particle sizes make creating a dome easier. This is reclaimed after the clay has dried, and we already had several tonnes onsite for our lime rendering
- 200kg of fireclay powder – this was mixed with two parts building sand and used in the base of the oven
- 100 wine bottles – to insulate and bulk out the base. It was tough work but we finally collected enough…
- 20kg vermiculite (or similar insulative material) – layers of this were compacted into the fireclay and sand mix in the base to provide insulation
- 14 kiln shelves at 11″ x 17″ – this was the most expensive part of the build. We wanted a smooth, hard-wearing and food-safe surface to cook pizzas on directly
- 50 storage heater bricks – placed beneath the kiln shelves, these retain heat in the base which helps with slow cooking. Fortunately a friend had just refurbished a house and dropped these off for free
- 20 red bricks – to construct the door arch
- A door for the oven (optional)
- Some tools that make the jobs a lot easier: hammers, bits of wood for whacking, tarps, a cement mixer, trowels
On the Saturday morning, Sam (on the left) showed us how to mix and puddle the clay, sand, grog and straw. This first round of puddling created the mixture for the inner layer of the clay oven. For this layer we used (approximately) 500kg of clay, 300kg building sand (roughly 40% of the mix), 30kg of grog and about a wheelbarrow of chopped straw. This is significantly less sand to clay than most clay ovens I have read about, so I hope that it doesn’t crack too much after drying and firing. The ingredients need to be combined as well as possible. Feet and a tarp are the best method for doing this. Fortunately it wasn’t too cold!
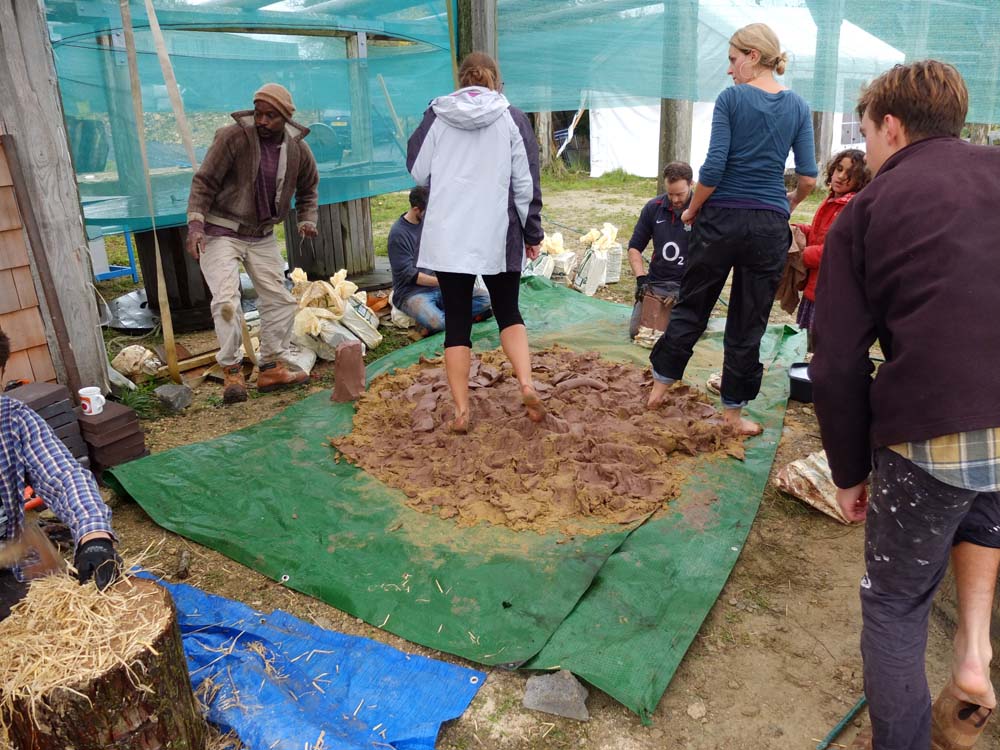
Grog, sand and straw are added for a number of reasons. They add strength to the clay whilst it is wet, allowing you to build the clay oven’s walls and dome without risk of it collapsing. They also bulk out the clay and help it to dry faster, more evenly and with less shrinkage. They do this by separating the clay particles which would otherwise bind very tightly. Every now and then the clay, which becomes thinly spread across the tarp, is rolled up using the tarp and puddled again.

Meanwhile we built a ring of blocks inside the base. Outside the ring we used more subsoil to make up the height. We did this so that we didn’t use the more expensive materials in the corners of the base, where they would have no effect. This ring was larger than the floor of the of the clay oven above, so that the whole of the oven was sitting on the insulated area. The first layer inside the ring was made up of glass bottles. Empty bottles provide good insulation, and help stop heat being transferred to the subsoil beneath. Make sure that you remove the bottle tops.

Above the bottle layer we used the fireclay and sand mix. This was mixed without water (the damp sand was enough to bind it) so that it didn’t shrink or settle too much as it dried. This was compacted well (mainly by jogging on the spot and dancing badly). Layers of vermiculite were added to help insulate the base.

Whilst the base was being prepared, the first clay / sand / straw / grog mix was being turned into blocks which we could build the dome with. The bricks were made by taking chunks of clay(which is quite hard to separate as the straw fibres bind it all together) and pounding them against a flat surface until a block is formed. They don’t have to be perfect and can vary in size (smaller ones are useful for the upper parts of the dome) as they will be hammered into place. Whilst the blocks were made, another group prepared a second mix of clay / sand / straw / grog for the outer layer of the clay oven. As with the first batch, we used our feet to mix it all up on a tarp. This outer layer is more insulative, with less sand (about 30% of the mix) and more straw, which made it harder to mix. You can add vermiculite to this mix to help insulate the clay oven.

The blocks for the outer layer (on the left) were made smaller than those for the inner layer. With the wind picking up and the light fading we covered the base and bricks (to avoid them drying out or getting too wet) and called it a night.
The next morning we started laying the storage heater bricks on the base. Once these were arranged we placed the kiln shelves on top. These layers didn’t reach to the outside (to save money) but that wasn’t a problem as there was enough space for the floorplan of the clay oven, and the area outside this would be covered with slabs later on. Once we had the oven shape marked out we started to pile on sharp sand. This was added until we had a smooth dome which was the width and height we wanted the interior of the clay oven to be (4ft wide by 2ft high). The stick is there as a guide, so that we would know when we’d reached the correct height. The door that Sam is holding in the photo below was made by a local metalworker. We will add an oak front and handles to it so it can be easily placed and removed. Clay oven doors are rarely hinged, and usually slide in and out. A door is not required for pizzas, but is necessary if you want to slow roast in the oven once a fire has gone out.

When the dome was ready the larger blocks were built up in courses, making sure that the joints were offset, just as you would build a normal wall. Leftover clay mix was added into any gaps between them, but you don’t have to be too careful as the whole lot will be compressed. You can put wet newspaper on the sand pile to stop the sand sticking to the blocks on the inside, but it isn’t necessary.

At this point you ignore the door and build the courses all the way around. The hole for the door is cut out later on. In order to close the gaps up and get rid of air pockets we used wooden planks to beat the dome. This also helped to shape it – by hitting the clay it was surprisingly easy to get rid of any lumps or high points.

It is possible to add clay mix to build out any low points. The dome is scratched to give a good key and the mix is thrown on and hit to remove any air bubbles. After a lot of hitting we had a round dome. We then applied the smaller blocks to make the walls thicker (the walls were about 6″ when finished, which should retain heat well). These blocks were pounded on a flat surface until they formed slabs which were about 2″ thick and then added to the dome. We used mallets to knock any bubbles out and bind the two layers of clay.

The dome was then hit with wood again to give as round a shape as possible. Once we were happy with the rough shape we finished it with smaller pieces of wood. These were scraped across the surface, leaving a smooth, even finish (this turned out to be unnecessary, as I decided to lime render the dome some weeks later, which involved cross-hatching the surface to give a good key to the lime). We also constructed the door arch at this stage. Using the metal door as a guide we built the arch out of red bricks and connected these to the oven dome with left over clay bricks (again, pounded to remove air bubbles). The clay oven is left as a solid dome whilst you construct the archway – the entrance is cut into the wall later on. Optimum door height is 63% of the oven’s internal height (for drawing air, heat circulation and so on). Whilst this is flexible, you won’t want to deviate too much from this ratio. The metal door was held up with a thin piece of wood (about 5mm) whilst we built the arch. This piece of wood is removed a week or two later so that the door can come out without getting stuck. We also found it useful to cut a plywood template to rest the front of the brick arch on. A mix of clay and sand was used as mortar – this is easier to work than the mix with straw fibres in.

As night fell and the wind and rain picked up (the forecast at this point was still suggesting 70mph winds from St Jude, making us all a bit nervous about the 50m² tarp fixed above the oven!) we continued to smooth the dome and doorway. We then wrapped the oven with tarps and hoped for the best!

Fortunately the winds were lighter than forecast and no damage was done. After a couple of weeks Sam returned and we removed the plywood and the metal door. Using an old bread knife we then cut into the oven walls behind the door. We chamfered the internal walls to provide better access to the sides of the clay oven, and also sculpted a shallow channel into the ceiling of the door opening for smoke to follow into the flue. We removed some of the sand from the interior, but I waited another couple of weeks before removing all of it (the clay was drying slowly due to the season and I didn’t want to risk a collapse).
At this stage Sam and I also sculpted the clay to ensure that the door fitted tightly, and cut a hole out for the chimney. We left a small lip inside the chimney hole for the flue to rest on. There is a fair bit of debate online and in books regarding the correct flue size, but a general rule is that the flue to fire opening (doorway) should be 1:9. If the flue is far too big then the oven will not heat up effectively. If the flue is too small then smoke will come out of the door rather than the chimney. Clay ovens are particularly prone to this as the flue is often short and will be colder than the flue of an indoor woodburner. Both of these factors significantly reduce draw. I decided to go with a 6″ insulated flue. As the oven is still drying I haven’t yet installed the flue, but hope to do so in February. It’s worth noting that a flue is entirely optional – many ovens let the heat and smoke escape through the door – but as our clay oven is under a roof (and the smell of burning fringe isn’t the most appetising of odours) we decided to install one.
Steve returned a few weeks after the building weekend and we lime rendered the base (it will have one more coat in the spring) and laid polished sandstone slabs around the oven, carefully scribed and cut to fit the shape. Slabs can be quite pricey – fortunately these had been lying in my mum’s garden for several years! We also lime rendered the clay oven itself, whilst the clay was still damp. This was recommended to us by all of the lime experts that we spoke to, the idea being that the lime would bond with the clay and they would dry together, creating a better adhesion. We used a very soft lime putty which would accommodate movement in the clay during drying and firing. Unfortunately, the clay moved and shrunk too much as it dried, leaving the lime as a solid layer a few millimetres off the clay oven’s dome. We removed the render and bagged it up (it can be wetted again and reapplied), and found that some of it had indeed bonded to the clay. This will provide a good key and make the application much easier in the spring.

The clay oven is almost dry now – some cracks have appeared during the drying process but nothing too major and we will fill them with clay mix. We hope to fit the flue and fire it for the first time in a month or so when we’ll invite everyone who helped with the build to try the first pizzas. We’re putting a wooden floor down around the oven and if everything goes well then we hope to offer pizzas to campers from late spring onwards – our Clay Oven & Cafépage will be updated as soon as possible.
No Comments